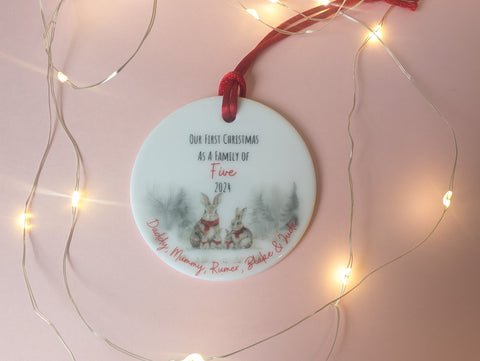
Looking for a unique, affordable way to create personalised Christmas baubles? With water slide decal transfer paper, you can turn any design into a custom decoration without needing costly sublimation equipment! In this guide, I’ll walk you through making a beautiful ceramic bauble, step-by-step, using tools like Canva, a Canon printer, and your Silhouette Cameo. Get ready to create a standout ornament for your holiday décor or as an adorable gift.
Supplies Needed:

Step-by-Step Guide
Design Your Bauble in Canva
Begin by designing your bauble artwork in Canva. Start with a blank canvas and select the size that fits your bauble dimensions. Add text, festive elements, or graphics that match your style. Personalized designs like names, dates, or holiday icons can make the bauble even more special. Canva has so many different free elements that you can use. Don't forget to make the most of Canva's text effects to really make your design pop.

Set Up Your Silhouette Cameo File
After completing your design, save it as a PNG and import it into Silhouette Cameo’s software. Make sure to turn on registration marks so the machine knows where to cut around your design accurately. Create a circle the same size as your design, and then position your imported design inside.

Print Your Design on Clear Transfer Paper
Load your Canon IP8750 printer with A4 clear water slide decal transfer paper. Go to your print settings, select “gloss media,” and choose high-quality printing for the best detail and color vibrancy. Print your design, and leave to dry before moving.

Seal the Print with Acrylic Sealer
Take the printed transfer paper outdoors for ventilation and spray it with an acrylic sealer to make the decal water-resistant. Apply three coats, waiting one hour between each coat. This step is essential to prevent the ink from bleeding when the decal is submerged in water.

Cut the Design with Silhouette Cameo
Once the sealer is completely dry, place the transfer paper on your Silhouette Cameo cutting mat, aligning it within the mat guide marks. Send the file to cut, and the machine will precisely cut around your design, making it easy to transfer onto the bauble.

Submerge the Decal in Water
Grab a bowl of warm water, and carefully submerge the cut decal in it. After around 60 seconds, you’ll see the backing paper start to peel away. This means the decal is ready to be applied. Handle it gently to avoid tearing.

Apply the Decal to the Bauble
Slide the decal onto the ceramic bauble, positioning it exactly where you want it. Use your fingers or a soft cloth to smooth out any air bubbles or wrinkles. Be gentle as the decal is delicate and can tear if handled roughly.

Blot Excess Water
Use a paper towel to blot, not wipe, away any extra water from the bauble. Blotting gently helps the decal adhere smoothly without shifting. Be careful during this step as the decal is still fragile and could tear.

Let the Bauble Dry Completely
Place the bauble in a safe spot, allowing it to dry fully. Give it several hours, or even overnight, to make sure the decal adheres firmly and won’t slide or shift when touched.

Add a Ribbon for Hanging
Once the bauble is fully dry, thread a festive ribbon through the top. Your personalized ceramic bauble is now ready to hang on the tree or gift to someone special!